Last time we were together, I said I’d tell you about my homemade personal care and cleaning products, and I will. But first, a little update on my Potatoes in a Bucket.
Remember how pretty the foliage looked in the buckets? They ultimately grew a lot bigger than this picture shows!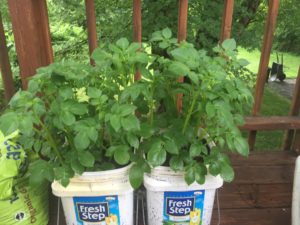
Well, fast forward to last week. Ray decided it was time to harvest (the foliage had died down like it is supposed to), so he dumped the buckets. Here’s all of what we found – the total harvest:
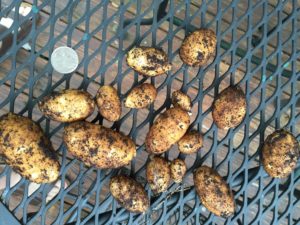

Notice the quarter for size! The entire harvest made a nice bowl of potato salad, just enough for the two of us! Oh, well, we will try again next year. It didn’t cost anything and was fun to watch. I’ll research a bit more over the winter to see what we didn’t do that we should have done and/or what we did that we shouldn’t have done.
O.k., on to other things!
When I was still working and taking the bus to work, one of my rider friends told me she made her own hand creams, soaps, etc., and brought me a jar of her hand cream (thanks, Barbara!). I thought that was such a cool idea, but could not imagine how someone could do that at home. I used the cream, loved it, but did not think much more about it.
Then, after I retired, I had time to read, and was finding out about so many things we use in our day to day life that have so many chemicals and other harmful things in them. Also read up on the animal testing that almost all regular personal care product manufacturers use. Being such an animal lover, that was really hard for me to accept. So, I thought about Barbara, and decided that if she could do it, I could too.
I started searching the internet and was astounded by what I found. You can make ANYTHING at home that you can buy in a store. I found websites, articles, recipes, etc. all over the place. I’ll give you a list of some of my favorite websites at the end of this post.
I saved recipes, pored over them to find out what I needed to get started, and began.
First with household cleaners. All-Purpose sprays, window cleaner, laundry detergent and softener, dishwasher detergent (I use powder, but one can make the liquids and even tabs if you prefer). Instead of paying $10 or more for a jug of laundry soap that has all manner of chemicals in it, I make a gallon jug for about $1.50 and you only use a quarter cup per load. Lasts a really long time! For the cleaning supplies, you can buy Borax, Washing Soda, white vinegar, etc. easily at any major grocery store, so these are readily available. I even found that I can make my own Washing Soda (an ingredient in many of my products) from baking soda. I buy large bags (13.5 pounds) of Baking Soda at Costco for about $5 and use it for so many things! A 1.5 gallon jug of vinegar is only a couple of dollars at Costco (I LOVE Costco!). I have graduated to more complicated things like dish soap, enzyme scrub, febreze, gel air fresheners, reed diffuser air fresheners, drain cleaner, scouring powder, toilet bowl cleaner, etc. It’s even easy to make disposable cleaning cloths, baby wipes, etc.
For the personal care items, I found a website that offered all that I needed at a price that I thought was fair. So I placed an order (I think it was around $50 and I still have some of the things that don’t get used so much), and got going. The first few things I made were Facial Moisturizer, hand sanitizer (without chemicals or alcohol), deodorant (that works extremely well), body wash, liquid/foaming hand wash, shampoo, lotion bars, lip balm, baby powder without talc, anti-itch cream, insect repellant (Ray carries a spray bottle with him to the golf course – he loves it – says it works really well and it only costs about $.10!), and none of these things are expensive. Most take under 3 minutes to make and probably cost under $2. The facial moisturizer and hand cream probably take the most time to do, since you have to melt coconut oil (used in SO many of my products) and a bit of beeswax, let it cool completely and then whip with a stick blender. So for those, about 5 minutes to melt in the microwave, cool for about an hour, and then whip for maybe 5 minutes. I used to use Arbonne facial moisturizer and it retailed at $82 per jar (I was a dealer, so I got a really good discount). Now I make one that only costs about $2 and a few minutes time, and makes at least twice what I was getting from Arbonne. Extra jars are kept in the refrigerator to keep them fresh (if friends don’t get them first!). A good return, I think!
I give some samples to some of my friends, and they all love them. I don’t want to do this as a business, but I enjoy sharing with friends and family.
I went to the doc a week or so ago, and he said that he thought I had IBS, and said I should take Metamucil or the like. So, of course, the first thing I did when I got home was google “homemade Metamucil”. Ha! Psyllium Husks and Stevia. So rather than buying, it took me about 2 minutes to make and it works like a charm. My dear friend Marilyn shared her psyllium and stevia with me so I didn’t even have to shop to get started. Thanks Marilyn! So now, every time I need anything that I don’t already have, I look around to see if I can make it myself. Just google “homemade [fill in the blank]” or “DIY [fill in the blank]” and you will have lots of results!
Some websites that I like:
Tree Hugger, One Good Thing by Jillee, Crunchy Betty, Mother Nature Network, Wellness Mama, and many others.
For supplies I like:
Bulk Apothecary, Vitacost, and of course Amazon. For bottles and jars in smaller quantities (Bulk Apothecary now wants to sell you a minimum of 50 pieces), I have been using Speciality Bottle. You can often find jars etc. on eBay. For small jars and bottles (travel size) a good source is The Container Store, and you can sometimes find good ones at discount and drug stores in their travel sections.
I hope you have enjoyed this post. If you would like more information or suggestions, or even specific recipes just let me know. I have really enjoyed learning about and making my own products.
P.S. Just today, not long after I published this post, I read an article that really struck home, and further strengthened my resolve to only use non-toxic products. Here’s a link: Chemical Exposure Plummets. Check it our for yourself!